Introduction
The DynamicPDF HTML Converter product is available and included with any of our subscription plans (subscription pricing). You can also use DynamicPDF HTML Converter free if you accept a small footer stating "Created with the DynamicPDF Essentials Edition" and link to the DynamicPDF website from a public area of your website. DynamicPDF HTML Converter supports the following features,
- quickly converts HTML to PDF,
- supports the latest HTML, CSS, and JavaScript,
- works with files, byte arrays, and URLs,
- supports custom headers and footers,
- supports .NET Framework and .NET Core (including Linux),
- and supports a transparent pricing model.
As this tutorial will demonstrate, DynamicPDF HTML Converter is an intuitive yet powerful library for converting HTML files, URLs, and webpages into PDF documents. A video tutorial is also included if you prefer watching the video rather than reading this tutorial. Or better yet, watch the video and work through the written tutorial. All source is available on Github, and the video is available here or on our YouTube channel.
The Converter and ConversionOptions Classes
The DynamicPDF HTML Converter namespace (ceTe.DynamicPDF.HtmlConverter documentation), consists of four classes,
and two enumerations,
Of these, the two classes most important for understanding this tutorial are the Converter and ConversionOptions classes. The Converter class is how we convert the document from HTML to PDF using the static Convert or AsyncConvert methods. Both methods are overloaded to support different ways of processing HTML conversion. Although these two methods are all that is required, if you wish to perform any formatting of a PDF document, then you must use the ConversionOptions class to format that PDF. The ConversionOptions class supports specifying a PDF document's metadata, such as author, subject, and name. It also supports formating a PDF document by specifying page size, page orientation, headers, footers, and margins.
Now that we discussed the Converter and ConversionOptions classes let's explore using these classes to convert and format HTML to PDF.
Creating the Project
Start by creating or downloading the project. You can choose to follow the instructions here or download the project from GitHub (link).
using System;
using System.IO;
using System.Threading;
using System.Threading.Tasks;
using ceTe.DynamicPDF.HtmlConverter;

namespace ConsoleAppHtmlToPdf
{
    class Program
    {
       static void Main(string[] args)
       {
        Console.WriteLine("Hello World!");
       }
    }
}
Convert Dynamically Generate PDF
After creating the project, in this first example, we dynamically generate a PDF using an HTML table generated by sample form data.
- Create a new method named ConvertDynamicHtmlToPdf and add a multidimensional array as a string parameter.
- Create sample data to load and display as an HTML table.
static string[,] companyData = {{ "Grey Fox Brewing", "Mark Smith", "Canada" },
{"Deutsche Ingolstadt","Elias Schneider","Germany"},
{"Centro comercial Moctezuma","Alejandra Silva","Columbia"},
{"West Indies Trading Company","Helen Moore","UK"},
{"Bharat of India","Aarnav Chanda","India"},
{"Magazzini Alimentari Riuniti","Giovanni Esposito","Italy"},
{"Joyas de Cristal","Helena Garcia","Spain"},
{"Telemar Brasil","Elias Martinez","Brazil"},
{"Joe's Pizzaria","Joe Bowman","United States"} };
The data consists of an array containing each entry which consists of the company name, contact name, and the country the company is located.
static void ConvertDynamicHtmlToPdf(string[,] data)
{
     string head = "<html><head><style>"
         + "table {font-family:arial, sans-serif;border-collapse:collapse;width:100%;}"
         + "td,th {border:1px solid #dddddd;text-align:left;padding:8px;}"
         + "tr:nth-child(even){background-color:#dddddd;}"
         + "</style></head><body>";
     string title = "<h2>Company Contacts Listing</h2>";
     string rowHeader = "<tr><th>Company</th><th>Contact</th>"
         + "<th>Country</th></tr>";
     string[] tableTag = { "<table>", "</table>" };
     string close = "</body></html>";

     StringBuilder output = new StringBuilder(head).Append(title);
     output.Append(tableTag[0]);
     output.Append(rowHeader);

     int i = 0;
     foreach (string rec in companyData)
     {
          if (i++ % 3 == 0) output.Append("<tr>");
          output.Append("<td>").Append(rec).Append("</td>");
           if (i % 3 == 0) output.Append("</tr>");
      }

      output.Append(tableTag[1]).Append(close);
      Converter.Convert(output.ToString(), "example5.pdf");
}
After creating our newly created method, add it to the project's Main method.
- Modify Main to call the newly created method.
- Run the program and review the created PDF document.
static void Main(string[] args)
{
     ConvertSaveToFileNoInputHtml();
}

As this first example illustrated, creating a PDF document from dynamically generated HTML data is straightforward and only required a document path as a URL and the PDF output.
Convert HTML to PDF Using URI
As the previous example illustrated, generating PDF from HTML is easy when using DynamicPDF HTML Converter. Now let's convert a PDF using a URI to an HTML document, only this time we use a large HTML document combined with ConversionOptions to format the PDF and then save it to a local file.
- Create a new static method named ConvertSaveToFileNoInputHtml.
- Add the URL to the Project Guttenberg's "A Tale of Two Cities."
- Create a ConversionOptions instance and add the margins, author, creator, title, subject, and the header and footer to the ConversionOptions properties.
- Call the Converter.Convert method, passing the URL document to convert, the output path for the PDF document, and the conversion options.
- The code for the ConvertUriToPdf method should appear as follows.
static void ConvertUriToPdf()
{
     // method signature: public static void Convert(Uri uri, string outputPath,
    // ConversionOptions conversionOptions = null);

    string outputDocumentPath = "./tale-two-cities--document.pdf";
    string taleOfTwoCities = "https://www.gutenberg.org/files/98/98-h/98-h.htm";
    Uri resolvePath = new Uri(taleOfTwoCities);
    double leftRightMarginsPts = 36;
    double topBottomMarginsPts = 144;

    ConversionOptions conversionOptions = new ConversionOptions(PageSize.Letter,
           PageOrientation.Portrait, leftRightMarginsPts, topBottomMarginsPts);
           conversionOptions.Author = "Charles Dickens";
           conversionOptions.Creator = "James B";
           conversionOptions.Title = "A Tale of Two Cities";
           conversionOptions.Subject = "Guttenberg press version of Charles Dickens\'s"
               + " A Tale of Two Cities.";
           conversionOptions.Header = "<div style = 'text-align:center;width:100%"
               +";font-size:15em;'>A Tale of Two Cities</div>";
           conversionOptions.Footer = "<div style='text-align:left;"
               +"text-indent:10px;display:inline-block;"
               + "font-size:6em;'><span class=url></span></div>"
               + "<div style = 'text-align:center; display:inline-block; width:60%'></div>"
               + "<div style = 'text-align:right; display:inline-block;"
               +"font-size:6em;'>Page <span class=\"pageNumber\">"
               + "</span> of <span class=\"totalPages\"></span></div>";

     Converter.Convert(resolvePath, outputDocumentPath, conversionOptions);
}

As this second example illustrated, the conversion from HTML to PDF in this example was also straightforward. The ConversionOptions class, although optional, provides powerful options to format a PDF. For example, in the code above, we created a header from CSS that wrote the title at the top of each page. We also created a footer from CSS that wrote the path and page number at the bottom of each page.
Convert with Base Path and URI
The Convert method consists of an overloaded method that takes an input HTML string, a URL, and an optional ConversionOptions parameter. The following is the method's signature.
public static void Convert(string inputHtml, string outputPath, Uri basePath = null,
     ConversionOptions conversionOptions = null);
The inputHtml is the string content containing HTML, while the basePath is the URL to the document's root path. This overloaded Convert method is how we can process an HTML document using a baseTag. Refer to HTML baseTag on W3Schools for more details on HTML base paths.
- Create a static method named ConvertSaveToFileInputHtml.
- Add an array with two relative paths.
- Create a string containing links to the relative paths in the array.
- Create a new URI containing the path listed below to Wikimedia Commons.
- Call the Convert method, passing the input HTML, the output path, and the URI.
- Create a new ConversionOptions instance and set the page size, page orientation, and the left/right and bottom/top margins.
- Reduce the zoom to 25% by setting the Zoom property in ConversionOptions.
- Add the ConvertSaveToFileInputHtml method call to the Main method.
static void ConvertSaveToFileInputHtml()
{
        // method signature: public static void Convert(string inputHtml, string outputPath,
        // Uri basePath = null, ConversionOptions conversionOptions = null);

       string[] filePaths = new string[]{ "./e/ea/Doel_-_Water_pump_1.jpg",
           "./3/3a/The_Soviet_Union_1939_CPA_690_stamp_%28Plane%29_cancelled.jpg"
        };

        string tempHtml = "<html><body><img src=\"" + filePaths[0] + "\">"
             + "<img src=\"" + filePaths[1] + "\">" + "</body></html>";

        Uri resolvePath = new Uri("https://upload.wikimedia.org/wikipedia/commons/");
        Converter.Convert(tempHtml, "example1.pdf", resolvePath);

        ConversionOptions conversionOptions = new ConversionOptions(PageSize.Tabloid,
                PageOrientation.Landscape, 1, 1);
        conversionOptions.Zoom = 0.25F;

        Converter.Convert(tempHtml, "secondTry.pdf", resolvePath,conversionOptions);

}
- Run the program and review the PDF output.
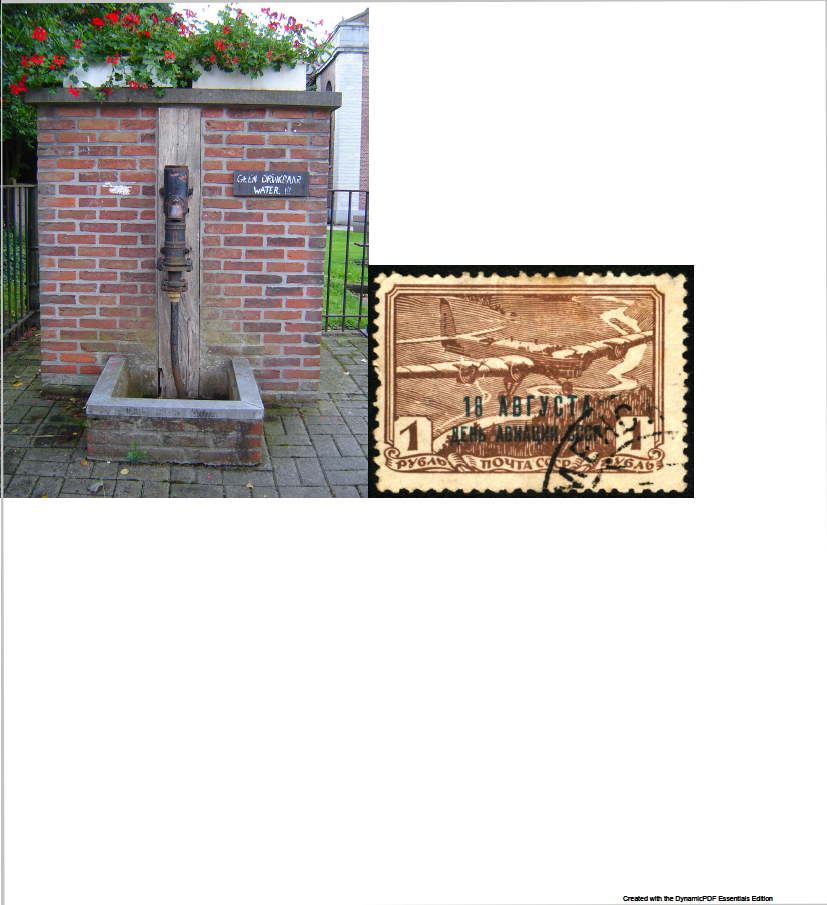
In this example, we created a PDF document by combining an HTML string with its base path URI (https://upload.wikimedia.org/wikipedia/commons/). The complete HTML resolved as follows.
<html><body>
<img src="https://upload.wikimedia.org/wikipedia/commons/./e/ea/Doel_-
_Water_pump_1.jpg">
<img src="https://upload.wikimedia.org/wikipedia/commons/./3/3a/The_Soviet_Union_1939_
CPA_690_stamp_%28Plane%29_cancelled.jpg">
</body></html>
We then added document formatting, followed by calling the Convert method to write the PDF document. Note that the conversion options included formatting the output page as tabloid, the orientation as landscape, and the margins as 1 for the left/right and top/bottom margins.
Convert with CSS and JavaScript
Now let's create the method ConvertHtmlWithCssJavaScriptToPdf to illustrate converting embedded CSS and embedded JavaScript.
- Add the samplePageWithCss and samplePageWithJavaScript variables to the Program class.
static string samplePageWithCss = "<!DOCTYPE html><html><head ><style>"
+ "body {background-color: lightblue;}"
+ "h1 {color: white; text-align: center;} p "
+ "{font-family: verdana;font - size: 20px;}</style>"
+ "</head><body><h1>My First CSS Example</h1>"
+ "<p>This is a paragraph.</p></body></html>";
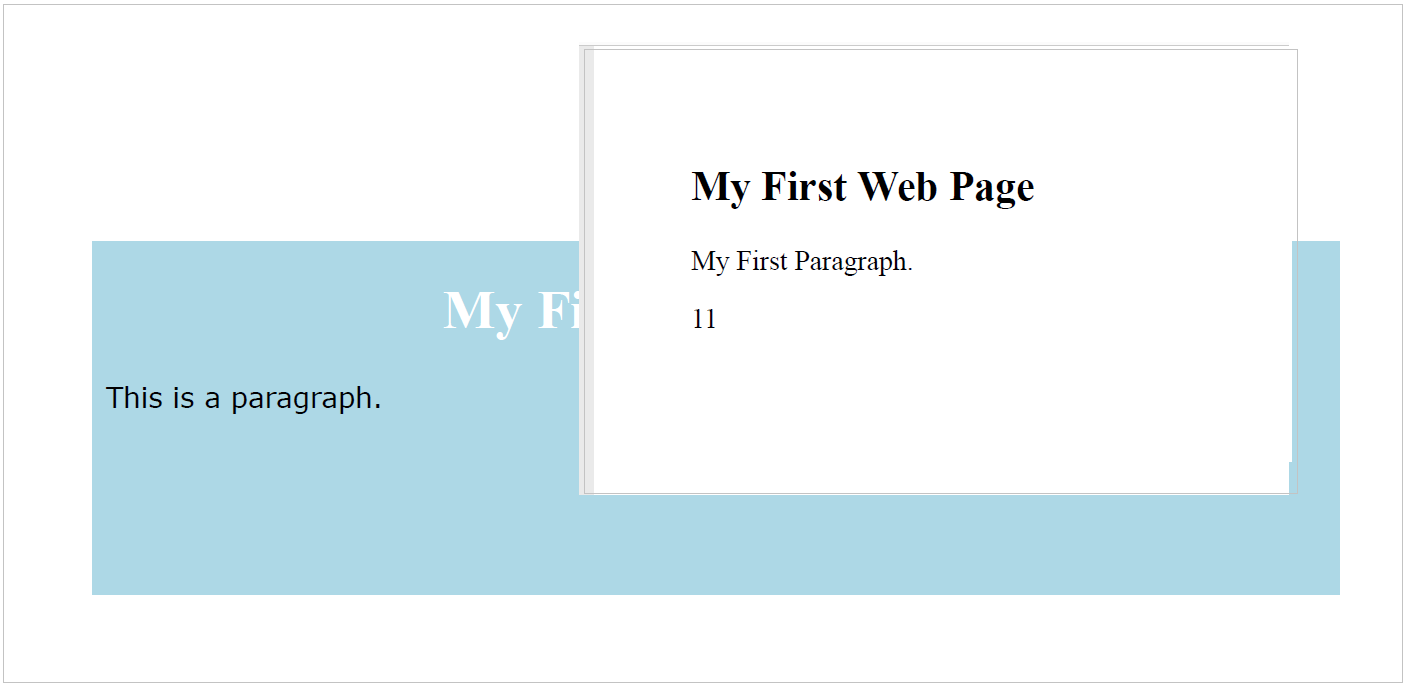
static string samplePageWithJavaScript = "<!DOCTYPE html><html><body>"
+ "<h2>My First Web Page</h2>"
+ "<p>My First Paragraph.</p><p id=\"demo\"></p>"
+ "<script>document.getElementById(\"demo\")"
+ ".innerHTML = 5 + 6;</script></body></html>";
- Create a new method named ConvertHtmlWithCssJavaScriptPdf.
- Convert the embedded CSS and embedded JavaScript to PDFs.
static void ConvertHtmlWithCssJavaScriptPdf()
{
    // method signature: public static void Convert(string inputHtml, string outputPath,
    // Uri basePath = null, ConversionOptions conversionOptions = null);

     Converter.Convert(samplePageWithCss, "cssExample.pdf");
     Converter.Convert(samplePageWithJavaScript, "jscriptExample.pdf");
 }
After running the method, both PDF documents output formatted CSS and JavaScript. As the two examples illustrate, DynamicPDF HTML Converter seamlessly supports CSS and JavaScript embedded in HTML documents.
Convert to Byte Array
You can also convert a PDF to a byte array rather than saving it to a file. In this example, we convert an HTML document into a byte array.
- Create a new static method named ConvertWriteToByteArrayNoInputHtml.
- Create a new ConversionOptions instance and pass the PageSize.Tabloid, PageOrientation.Landscape, and the left/right margin and top/bottom margins as 28 points.
- Create a new URI object instance and pass the CNN URL to the constructor.
- Call the Convert method, passing the URI and ConversionOptions as parameters and return a byte array as the result.
- Save the byte array to a file.
static void ConvertWriteToByteArrayNoInputHtml()
{
   // public static byte[] Convert(Uri uri, ConversionOptions conversionOptions = null);

   ConversionOptions conversionOptions = new ConversionOptions(PageSize.Tabloid, PageOrientation.Landscape, 28, 28);
   Uri document = new Uri("https://cnn.com");
   byte[] output = Converter.Convert(document,conversionOptions);
   File.WriteAllBytes("./cnn-printiout.pdf", output);
This simple example illustrated converting an HTML document to a PDF as a byte array. For simplicity, we saved the byte array to a file to demonstrate that the PDF was printed and formatted correctly.
Convert to Byte Array Asynchronous
For the final example, we convert an HTML document to a byte array asynchronously. If you ran the application in the first example, where it converted A Tale of Two Cities from HTML to PDF, then you probably noticed it took several seconds for the conversion to complete, as the document consists of 330 pages. When processing large documents, it makes sense to convert the document asynchronously so it processes without blocking the main thread. In this example, we convert HTML to PDF asynchronously.
- Create a new static method named ConvertAsyncReturnByteArray that specifies async and returns a Task.
- Create strings that specify the output document's path and the input document's path.
- Create a URI from the input document's path.
- Create a ConversionOptions instance, passing the page size as letter, the page orientation as portrait, and the margins as 28 points.
- Add a title and footer to the ConversionOptions instance.
- Call the ConvertAsync method and pass the input URI document and the ConversionOptions to the method as parameters. Return the output as a byte array.
static async Task ConvertAsyncReturnByteArray()
{
     // public static Task<byte[]> ConvertAsync(Uri uri, ConversionOptions
     // conversionOptions = null);

     string outputDocumentPath = "./gibbons-document.pdf";
     string gibbons = "https://www.gutenberg.org/files/731/731-h/731-h.htm";
     Uri resolvePath = new Uri(gibbons);
     double leftRightMarginsPts = 28;
     double topBottomMarginsPts = 28;

     ConversionOptions conversionOptions = new ConversionOptions(PageSize.Letter,
     PageOrientation.Portrait, leftRightMarginsPts, topBottomMarginsPts);
     conversionOptions.Title = "HISTORY OF THE DECLINE AND FALL OF THE ROMAN"
         + " EMPIRE";
      conversionOptions.Footer = "<div style='text-align:left;text-indent:10px;"
          +" display:inline-block; font-size:6em;'><span class=url></span></div>"
          + "<div style = 'text-align:center; display:inline-block; width:60%'></div>"
          + "<div style = 'text-align:right; display:inline-block;font-size:6em;'>"
          + "Page <span class=\"pageNumber\"></span> of <span"
          + "class=\"totalPages\"></span></div>";

      byte[] vals = await Converter.ConvertAsync(resolvePath, conversionOptions);
      File.WriteAllBytes(outputDocumentPath, vals);
}
- Modify the Main method to call the ConvertAsyncReturnByteArray method as an asynchronous task.
static void Main(string[] args)
{
     var task = ConvertAsyncReturnByteArray();
      int i = 0;
      while(task.IsCompleted == false) { Console.Write("\r" + i++); }
      task.Wait();
}
When we execute the program, it takes several seconds to build the PDF document. However, as the simple code in Main illustrates, it does not block the thread while making the PDF.
GitHub Project
The GitHub project is available here at DynamicPDF/blog-convert-html-to-pdf (project file).
Summary
In this tutorial, we explored using DynamicPDF HTML Converter. DynamicPDF HTML Converter supports synchronous and asynchronous document conversion. It also supports HTML strings with Base URLs, embedded CSS, and embedded JavaScript. And, as the examples illustrated, DynamicPDF HTML Converter supports formatting PDF with many formatting options. As the examples shown, creating a PDF from HTML is straightforward. Get started using Dynamic HTML Converter today by using the free version or by purchasing a subscription today.