Tables
A table consists of one or more columns and one or more rows. Each row contains one or more cells. A cell contains plain text or any page element (see Adding Page Elements to Cells for more information on adding page elements to a cell). A table consists of a Table2 class, one or more rows (Row2 class), one or more columns (Column2 class), and one or more cells (Cell2 class).
Table2
Use the Table2 class to create a table. This class uses the Row2, Cell2, and Column2 classes to construct a table. The Table2 class has numerous properties for table-wide layout and adding rows and cells. Refer to the Table2 API documentation for a complete example.
Row2
A Table2 has a Rows property that contains the table's row. The Rows property is a Row2List that contains the actual Row2 instances.
Cell2
The Row2 class contains a Cells property that contains a row's cells. The Cells property is a Cell2List that contains the actual Cell2 instances.
Column2
A table also has a Columns property that contains the table's columns. Columns are for specifying each column's width and do not specify content. The Columns property is a Column2List that contains the actual Column2 instances.
Simple Example
When creating a table, determine the number of columns and rows needed. Then create the needed columns followed by the needed rows. For each row, then add the cells, being certain the number of cells match the number of columns.
A row contains one or more cells. The number of cells added to a row matches the columns added to the table. The number of columns corresponds with the number of cells. The following example illustrates creating a 2x2 table.
Table2 table = new Table2(0, 0, 600, 600);
table.Columns.Add(150);
table.Columns.Add(90);
Row2 row1 = table.Rows.Add(40);
Row2 row2 = table.Rows.Add(30);
row1.Cells.Add("A1");
row1.Cells.Add("A2");
row2.Cells.Add("B1");
row2.Cells.Add("B2");
Dim table As New Table2(0, 0, 600, 600)

table.Columns.Add(150)
table.Columns.Add(90)

Dim row1 As Row2 = table.Rows.Add(40)
Dim row2 As Row2 = table.Rows.Add(30)

row1.Cells.Add("A1")
row1.Cells.Add("A2")

row2.Cells.Add("B1")
row2.Cells.Add("B2")

page.Elements.Add(table)
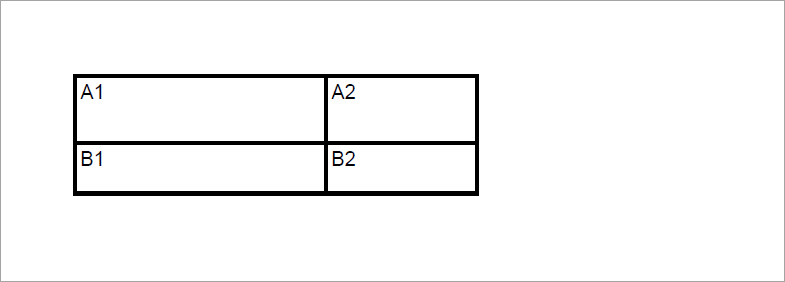 Figure 1. A Simple 2x2 table added to a PDF document.
Spanning Columns And Rows
A table can span rows and columns using a Cell2 instance's RowSpan and ColumnSpan properties. For example, the following code creates a 2x4 table where the cell in the first row and first column spans two rows while the table's first row and third column span two columns.
Table2 table = new Table2(0, 0, 600, 600);
table.Columns.Add(150);
table.Columns.Add(90);
table.Columns.Add(90);
table.Columns.Add(90);
Row2 row1 = table.Rows.Add(40);
row1.Cells.Add("A1");
row1.Cells[0].RowSpan = 2;
row1.Cells.Add("A2");
row1.Cells.Add("A3");
row1.Cells[2].ColumnSpan = 2;

Row2 row2 = table.Rows.Add(30);
row2.Cells.Add("B2");
row2.Cells.Add("B3");
row2.Cells.Add("B4");
Dim table As New Table2(0, 0, 600, 600)

table.Columns.Add(150)
table.Columns.Add(90)
table.Columns.Add(90)
table.Columns.Add(90)

Dim row1 As Row2 = table.Rows.Add(40)
row1.Cells.Add("A1")
row1.Cells(0).RowSpan = 2
row1.Cells.Add("A2")
row1.Cells.Add("A3")
row1.Cells(2).ColumnSpan = 2

Dim row2 As Row2 = table.Rows.Add(30)
row2.Cells.Add("B2")
row2.Cells.Add("B3")
row2.Cells.Add("B4")

page.Elements.Add(table)
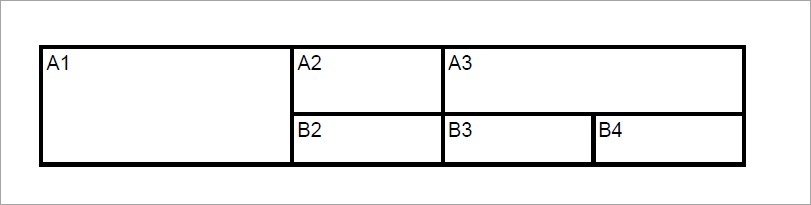 Figure 2. A table demonstrating spanning columns and rows.
Table Text Formatting
A table formats content within a PDF document and controls the data flow between sections or pages within that PDF (for more information, refer to Table Continuation). Formatting text (i.e., background color, font, font size, text color, and alignment) is hierarchical, where the precedence is the cell, row, and table. Each cell is handled hierarchically.
Formatting Precedence
Formatting at the table level applies the formatting to every cell. However, formatting a row takes precedence over the formatting specified for the table and uses the particular row's formatting rather than the table's. Formatting a cell takes precedence over the formatting specified within a row.
Example
The following example illustrates formatting a table. The table background color is red, and one of the cells overrides the table's color with the cell's color. The first row also formats its text as HelveticaBold, font size as sixteen, text color as blue and background for the row as gray. It then sets the first cell of the first row's background color as blue, font size as eighteen, and text color as orange.
Table2 table = new Table2(0, 0, 600, 600);
table.BackgroundColor = RgbColor.Red;

table.Columns.Add(150);
table.Columns.Add(90);

Row2 row1 = table.Rows.Add(40, Font.HelveticaBold, 16, Grayscale.Blue, Grayscale.Gray);
row1.Cells.Add("A1");
row1.Cells.Add("A2");

Row2 row2 = table.Rows.Add(30);
row2.Cells.Add("B1");
row2.Cells.Add("B2");
row2.Cells[0].BackgroundColor = RgbColor.Blue;
row2.Cells[0].FontSize = 18;
row2.Cells[0].TextColor = RgbColor.Orange;
Dim table As New Table2(0, 0, 600, 600)
table.BackgroundColor = RgbColor.Red

table.Columns.Add(150)
table.Columns.Add(90)

Dim row1 As Row2 = table.Rows.Add(40, Font.HelveticaBold, 14, RgbColor.Navy, Grayscale.Gray)
row1.Cells.Add("A1")
row1.Cells.Add("A2")
row1.Cells.Add("A1")
row1.Cells.Add("A2")

Dim row2 As Row2 = table.Rows.Add(30)
row2.Cells.Add("B1")
row2.Cells.Add("B2")
row2.Cells(0).BackgroundColor = RgbColor.Blue
row2.Cells(0).FontSize = 18
row2.Cells(0).TextColor = RgbColor.Orange

page.Elements.Add(table)
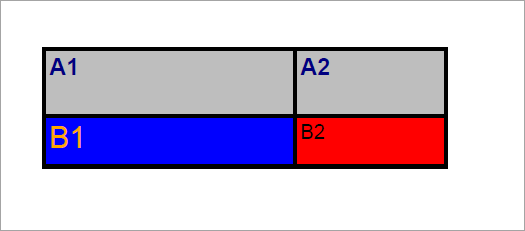 Figure 3. A table illustrating text formatting.
Table Borders
By default, both Cell2 and Table2 have a border width of one. Unless the widths are changed, this will result in a combined width of two. Therefore, to achieve a border around all cells with a value of one, the Table2 and the Cell2 instances should have their width set to .5. Note that when customizing a table's appearance, you will often have to modify the widths of the different cells, as the example below, when discussing CellBorderStyle, illustrates.
Border
A Cell2 has a Border property consisting of a Border instance.
Properties
| Property | Description |
|---|---|
| Bottom | Gets the CellBorderStyle object for the bottom border. |
| Color | Gets or sets the Color of the border. |
| Left | Gets the CellBorderStyle object for the left border. |
| LineStyle | Gets or sets the LineStyle of the border. |
| Right | Gets the CellBorderStyle object for the right border. |
| Top | Gets the CellBorderStyle object for the top border. |
| Width | Gets or sets the width of the border. |
CellBorderStyle
The Right, Left, Top, and Bottom properties can be set to allow custom styling of a cell's right, left, top, and bottom lines by using a CellBorderStyle instance. The CellBorderStyle has a Color, LineStyle, and Width property. Setting these properties for the right, left, top, or bottom of a cell overrides the property settings for the cell.
Example
The following example illustrates customizing a table's borders.
Dim table As New Table2(0, 0, 600, 600)
table.Columns.Add(150)
table.Columns.Add(90)
table.Border.LineStyle = LineStyle.None

Dim row1 As Row2 = table.Rows.Add(20)
row1.Cells.Add("Header")
row1.Cells(0).ColumnSpan = 2
row1.Cells.Add("Test")
row1.Cells(0).Border.LineStyle = LineStyle.None
row1.Cells(0).Border.Bottom.LineStyle = LineStyle.Solid
row1.Cells(0).Border.Bottom.LineStyle = LineStyle.Dash
row1.Cells(0).Border.Bottom.Color = RgbColor.Navy

Dim row2 As Row2 = table.Rows.Add(10)
Dim row3 As Row2 = table.Rows.Add(10)

row2.Cells.Add("A1")
row2.Cells.Add("A2")
row3.Cells.Add("B1")
row3.Cells.Add("B2")

row2.Cells(0).Border.LineStyle = LineStyle.None
row2.Cells(1).Border.LineStyle = LineStyle.None
row3.Cells(0).Border.LineStyle = LineStyle.None
row3.Cells(1).Border.LineStyle = LineStyle.None

table.Border.Top.LineStyle = LineStyle.Solid
table.Border.Top.Color = RgbColor.Red
table.Border.Bottom.LineStyle = LineStyle.Solid
table.Border.Bottom.Color = RgbColor.Red

page.Elements.Add(table)
Table2 table = new Table2(0, 0, 600, 600);
table.Columns.Add(150);
table.Columns.Add(90);
table.Border.LineStyle = LineStyle.None;

Row2 row1 = table.Rows.Add(20);
row1.Cells.Add("Header");
row1.Cells[0].ColumnSpan = 2;
row1.Cells.Add("Test");
row1.Cells[0].Border.LineStyle = LineStyle.None;
row1.Cells[0].Border.Bottom.LineStyle = LineStyle.Solid;
row1.Cells[0].Border.Bottom.LineStyle = LineStyle.Dash;
row1.Cells[0].Border.Bottom.Color = RgbColor.Navy;

Row2 row2 = table.Rows.Add(10);
Row2 row3 = table.Rows.Add(10);

row2.Cells.Add("A1");
row2.Cells.Add("A2");
row3.Cells.Add("B1");
row3.Cells.Add("B2");

row2.Cells[0].Border.LineStyle = LineStyle.None;
row2.Cells[1].Border.LineStyle = LineStyle.None;
row3.Cells[0].Border.LineStyle = LineStyle.None;
row3.Cells[1].Border.LineStyle = LineStyle.None;

table.Border.Top.LineStyle = LineStyle.Solid;
table.Border.Top.Color = RgbColor.Red;
table.Border.Bottom.LineStyle = LineStyle.Solid;
table.Border.Bottom.Color = RgbColor.Red;
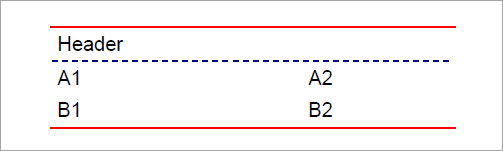
Figure 4. Table with formatted borders.
Customizing Example
The following example illustrates customizing a table's cells. It creates a 3x4 table, where the header and first column are shaded gray. It also changes spacing, the color of the top and bottom line, and the size of the font for the header and first column compared to the remainder of the table.
Document document = new Document();
Page page = new Page();
document.Pages.Add(page);

Table2 table = new Table2(0, 0, 600, 600);
Column2 column1 = table.Columns.Add(150);
column1.CellDefault.Align = TextAlign.Center;
table.Columns.Add(90);
table.Columns.Add(90);
table.Columns.Add(90);

Row2 row1 = table.Rows.Add(40, Font.HelveticaBold, 16, Grayscale.Black, Grayscale.Gray);
row1.CellDefault.Align = TextAlign.Center;
row1.CellDefault.VAlign = VAlign.Center;
row1.Cells.Add("Header 1");
row1.Cells.Add("Header 2");
row1.Cells.Add("Header 3");
row1.Cells.Add("Header 4");

Row2 row2 = table.Rows.Add(30);
Cell2 cell1 = row2.Cells.Add("Rowheader 1", Font.HelveticaBold, 16, Grayscale.Black, Grayscale.Gray, 1);
cell1.Align = TextAlign.Center;
cell1.VAlign = VAlign.Center;
row2.Cells.Add("Item 1");
row2.Cells.Add("Item 2");
row2.Cells.Add("Item 3");

Row2 row3 = table.Rows.Add(30);
Cell2 cell2 = row3.Cells.Add("Rowheader 2", Font.HelveticaBold, 16, Grayscale.Black, Grayscale.Gray, 1);
cell2.Align = TextAlign.Center;
cell2.VAlign = VAlign.Center;
row3.Cells.Add("Item 4");
row3.Cells.Add("Item 5");
row3.Cells.Add("Item 6");

table.CellDefault.Padding.Value = 5.0f;
table.CellSpacing = 5.0f;
table.Border.Top.Color = RgbColor.Blue;
table.Border.Bottom.Color = RgbColor.Blue;
table.Border.Top.Width = 2;
table.Border.Bottom.Width = 2;
table.Border.Left.LineStyle = LineStyle.None;
table.Border.Right.LineStyle = LineStyle.None;

page.Elements.Add(table);
document.Draw(outputPath);
Dim document As New Document()

Dim page As New Page()
document.Pages.Add(page)

Dim table As New Table2(0, 0, 600, 600)

Dim column1 As Column2 = table.Columns.Add(150)
column1.CellDefault.Align = TextAlign.Center
table.Columns.Add(90)
table.Columns.Add(90)
table.Columns.Add(90)

Dim row1 As Row2 = table.Rows.Add(40, Font.HelveticaBold, 16, Grayscale.Black, Grayscale.Gray)
row1.CellDefault.Align = TextAlign.Center
row1.CellDefault.VAlign = VAlign.Center
row1.Cells.Add("Header 1")
row1.Cells.Add("Header 2")
row1.Cells.Add("Header 3")
row1.Cells.Add("Header 4")

Dim row2 As Row2 = table.Rows.Add(30)
Dim cell1 As Cell2 = row2.Cells.Add("Rowheader 1", Font.HelveticaBold, 16, Grayscale.Black, Grayscale.Gray, 1)
cell1.Align = TextAlign.Center
cell1.VAlign = VAlign.Center
row2.Cells.Add("Item 1")
row2.Cells.Add("Item 2")
row2.Cells.Add("Item 3")

Dim row3 As Row2 = table.Rows.Add(30)
Dim cell2 As Cell2 = row3.Cells.Add("Rowheader 2", Font.HelveticaBold, 16, Grayscale.Black, Grayscale.Gray, 1)
cell2.Align = TextAlign.Center
cell2.VAlign = VAlign.Center
row3.Cells.Add("Item 4")
row3.Cells.Add("Item 5")
row3.Cells.Add("Item 6")

table.CellDefault.Padding.Value = 5.0F
table.CellSpacing = 5.0F
table.Border.Top.Color = RgbColor.Blue
table.Border.Bottom.Color = RgbColor.Blue
table.Border.Top.Width = 2
table.Border.Bottom.Width = 2
table.Border.Left.LineStyle = LineStyle.None
table.Border.Right.LineStyle = LineStyle.None

page.Elements.Add(table)

document.Draw(outputPath)
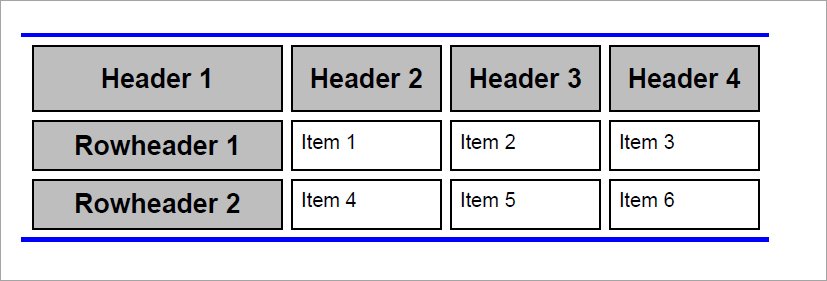
Figure 5. An example of adding a table to a PDF document.
Creating a Table
Planning the table's layout before creating it will save time. Here are a few strategies for creating a Table. To create a table that appears on a PDF, instantiate a Table2 class instance. Specify the Table2 instance's Height and Width and its X and Y coordinates. The x and y coordinates position the table's top left corner on the page at those coordinates. The table's height and width are the vertical or horizontal space allotted.
Knowing a table's final height and width at design time is optional. A table and its sizes are often dynamic and can be determined from dynamically generated data at runtime. Although instantiating a table instance requires setting the table's x, y, width, and height in its constructor, you can modify these values later.
One possible strategy is setting the height and width to the largest possible value a page can accommodate and later replacing the values if the table has less content. In addition to the x, y, height, and width, specify any formatting that has to be the default for the entire table here.
Next, define the table's column widths. Once the column width is set, it is read-only and can not be changed.
After defining the columns:
- Create the table.
- Start by adding a row to the table and then adding cells to that row.
- Repeat as necessary.
- Apply any formatting required to a table.
Add rows to the table, and - if applicable - set row height for the row. The row heights will be the minimum height; if needed, the height will automatically expand to fit the largest element (text or any page element that implements IArea) in that row. Note the third row in the example below. A table and its sizes are often dynamic and determined by dynamically generated data at runtime. Although instantiating a table instance requires setting the table's x, y, width, and height in its constructor, you can modify these values later.
One possible strategy is setting the height and width to the largest possible value a page can accommodate and later replacing the values if the table has less content. In addition to the x, y, height, and width, specify any formatting that must be the default for the entire table.
Next, define the table's column widths. Once the column width is set, it is read-only and can not be changed.
After defining the columns:
- Create the table.
- Start by adding a row to the table and then adding cells to that row.
- Repeat as necessary.
- Apply any formatting required to a table.
Add rows to the table, and you can also set the height for the row. The row heights will be the minimum height; if needed, the height will automatically expand to fit the largest element (either text or any page element that implements IArea) in that row. Note the third row in the example below.
// Create a PDF Document
Document document = new Document();

// Create a Page and add it to the document
Page page = new Page();
document.Pages.Add(page);

Table2 table = new Table2(0, 0, 600, 600);
table.CellDefault.Border.Color = RgbColor.Blue;
table.CellSpacing = 5.0f;

// Add columns to the table
table.Columns.Add(150);
table.Columns.Add(90);
table.Columns.Add(90);

// Add rows to the table and add cells to the rows
Row2 row1 = table.Rows.Add(40, Font.HelveticaBold, 16, RgbColor.Black,
    RgbColor.Gray);
row1.CellDefault.Align = TextAlign.Center;
row1.CellDefault.VAlign = VAlign.Center;
row1.Cells.Add("Header 1");
row1.Cells.Add("Header 2");
row1.Cells.Add("Header 3");

Row2 row2 = table.Rows.Add(30);
Cell2 cell1 = row2.Cells.Add("Rowheader 1", Font.HelveticaBold, 16,
    RgbColor.Black, RgbColor.Gray, 1);
cell1.Align = TextAlign.Center;
cell1.VAlign = VAlign.Center;
row2.Cells.Add("Item 1");
row2.Cells.Add("Item 2, this item is much longer than the rest so that " +
    "you can see that each row will automatically expand to fit to the " +
    "height of the largest element in that row.");

Row2 row3 = table.Rows.Add(30);
Cell2 cell2 = row3.Cells.Add("Rowheader 2", Font.HelveticaBold, 16,
    RgbColor.Black, RgbColor.Gray, 1);
cell2.Align = TextAlign.Center;
cell2.VAlign = VAlign.Center;
row3.Cells.Add("Item 3");
row3.Cells.Add("Item 4");


// Add the table to the page
page.Elements.Add(table);
// Save the PDF
document.Draw(outputPath);
Dim document As New Document()

Dim page As New Page()
document.Pages.Add(page)

Dim table As New Table2(0, 0, 600, 600)
table.CellDefault.Border.Color = RgbColor.Blue
table.CellSpacing = 5.0F

table.Columns.Add(150)
table.Columns.Add(90)
table.Columns.Add(90)

Dim row1 As Row2 = table.Rows.Add(40, Font.HelveticaBold, 16, RgbColor.Black, RgbColor.Gray)
row1.CellDefault.Align = TextAlign.Center
row1.CellDefault.VAlign = VAlign.Center
row1.Cells.Add("Header 1")
row1.Cells.Add("Header 2")
row1.Cells.Add("Header 3")

Dim row2 As Row2 = table.Rows.Add(30)
Dim cell1 As Cell2 = row2.Cells.Add("Rowheader 1", Font.HelveticaBold, 16, RgbColor.Black, RgbColor.Gray, 1)
cell1.Align = TextAlign.Center
cell1.VAlign = VAlign.Center
row2.Cells.Add("Item 1")
row2.Cells.Add("Item 2, this item is much longer than the rest so that you can see that each row will automatically expand to fit to the height of the largest element in that row.")

Dim row3 As Row2 = table.Rows.Add(30)
Dim cell2 As Cell2 = row3.Cells.Add("Rowheader 2", Font.HelveticaBold, 16, RgbColor.Black, RgbColor.Gray, 1)
cell2.Align = TextAlign.Center
cell2.VAlign = VAlign.Center
row3.Cells.Add("Item 3")
row3.Cells.Add("Item 4")

page.Elements.Add(table)

document.Draw(outputPath)
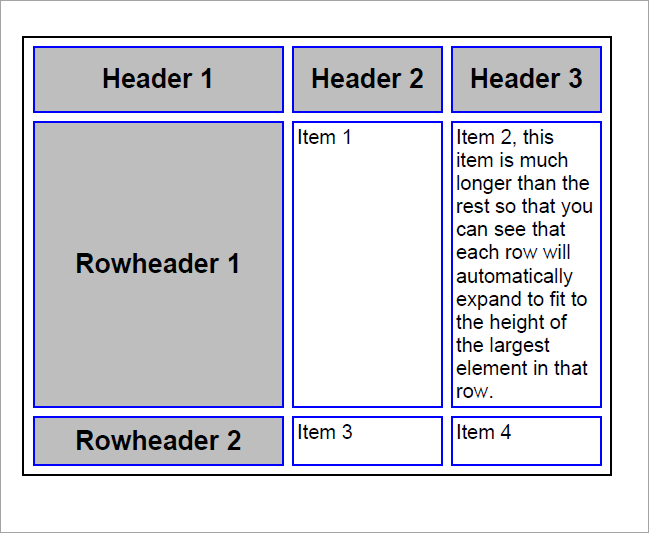
Figure 6. An example of adding a table to a PDF document.