Add JavaScript to PDFs
Using JavaScript to create auto-fillable, self-formatting, and validating form fields is a breeze when using DynamicPDF Core Suite for .NET. The following examples illustrate.
- How to Add Auto Fillable Form Fields using JavaScript
- How to Format Form Field Values Using JavaScript
- How to Validate Form Field Values using JavaScript
- How to Add Form Level JavaScript
- How to Add Document Level JavaScript
- How to Call Document Level JavaScript from a Form
- GitHub Project
- Getting Started
- Available on Other Platforms
How to Add Auto Fillable Form Fields using JavaScript
The following steps and C# sample code illustrate adding an auto-fillable Form field using JavaScript to a PDF document using DynamicPDF Core Suite for .NET.
Steps for Adding an Auto-Fillable Form Field using JavaScript
- Create a
Documentobject. - Create a
Pageobject and add it to theDocument. - Create two
TextFieldinstances. - Create a string containing the JavaScript to execute.
- Assign the string to the first
TextFieldinstance'sReaderEventsAnnotationReaderEvent.OnBlurevent. - Add the form fields to the
Page. - Add the
Drawmethod to output the PDF document.
Sample Code - C#
Document document = new Document();
Page page = new Page();
document.Pages.Add( page );
Label label1 = new Label("Please Enter your Date of Birth :", 50, 50, 200, 50);
TextField textField1 = new TextField("dob", 270, 50, 100, 50);
Label label2 = new ceTe.DynamicPDF.PageElements.Label("Your Age is :", 50, 120, 100, 50);
TextField textField2 = new TextField("age", 270, 120, 100, 50);

string javaScriptString = " var no = this.getField(\"dob\").value; var temp = Math.abs(new Date(Date.now()).getTime() - new Date(no).getTime()); var days = Math.ceil(temp / (1000 * 3600 * 24));this.getField(\"age\").value = Math.floor(days/365); ";

textField1.ReaderEvents.OnBlur = new JavaScriptAction(javaScriptString);
page.Elements.Add(label1);
page.Elements.Add(textField1);

page.Elements.Add(label2);
page.Elements.Add(textField2);

document.Draw( "output.pdf" );

How to Format Form Field Values Using JavaScript
The following steps and C# sample code illustrates using JavaScript to format a form field using DynamicPDF Core Suite for .NET.
Steps for Using JavaScript to Format a Form Field
- Create a
Documentobject. - Create a
Pageobject and add it to theDocument. - Create a string containing the JavaScript to execute.
- Assign the string to the first
TextFieldinstance'sReaderEventsAnnotationReaderEvent.OnBlurevent. - Add the form field to the
Page. - Add the
Drawmethod to output the PDF document.
Sample Code - C#
Document document = new Document();
Page page = new Page();
document.Pages.Add(page);

Label label1 = new Label("Please Enter a Number :", 50, 50, 200, 50);
TextField textField1 = new TextField("number", 270, 50, 100, 50);

string js = "var no = this.getField('number').value; this.getField('number').value = no.toFixed(2);";

textField1.ReaderEvents.OnBlur = new JavaScriptAction(js);
page.Elements.Add(label1);
page.Elements.Add(textField1);

document.Draw("output.pdf");
How to Add Form Field Level JavaScript
The following steps and C# sample code illustrates using JavaScript to perfom field value validation using DynamicPDF Core Suite for .NET.
Steps for Adding Form
- Create a
Documentobject. - Create a
Pageobject and add it to theDocument. - Create a string containing the JavaScript to execute.
- Assign the string to the first
TextFieldinstance'sReaderEventsAnnotationReaderEvent.OnBlurevent. - Add the form field to the
Page. - Add the
Drawmethod to output the PDF document.
Sample Code - C#
Document document = new Document();
Page page = new Page();
document.Pages.Add(page);

Label label = new Label("Please Enter a Number :", 0, 50, 150, 30);
TextField textField = new TextField("txt", 170, 30, 150, 30);
textField.DefaultValue = "0";
textField.ToolTip = "Enter only Numbers";

string jsString = " var no = this.getField(\"txt\").value; if( isNaN(no)) { app.alert(\"Please Enter number in the text field\"); } ";
textField.ReaderEvents.OnBlur = new JavaScriptAction(jsString);

page.Elements.Add(textField);
page.Elements.Add(label);

document.Draw( "output.pdf" );

How to Add Form Level JavaScript
Below are the steps and C# sample code to add a form level JavaScript to a PDF document using DynamicPDF Core Suite for .NET.
Steps for Adding Form Level JavaScript
- Create a
Documentobject. - Create a
Pageobject and add it to theDocument. - Create a
JavaScriptActionobject and provide the script to be executed. - Set the
Buttoninstance's behavior toBehavior.Push - Create a
Buttonobject and assign JavaScript to theButtoninstance'sActionproperty. - Add the
Buttonto thePage. - Add the
Drawmethod to output the PDF document.
Sample Code - C#
Document document = new Document();
Page page = new Page();
document.Pages.Add( page );

JavaScriptAction action = new JavaScriptAction("this.print({bUI: false, bSilent: true, bShrinkToFit: true});");

Button button = new Button( "Button Name", 200, 200, 100, 25 );
button.Behavior = Behavior.Push;
button.Label = "Submit";
button.Action = action;

page.Elements.Add(button);
document.Draw("output.pdf");
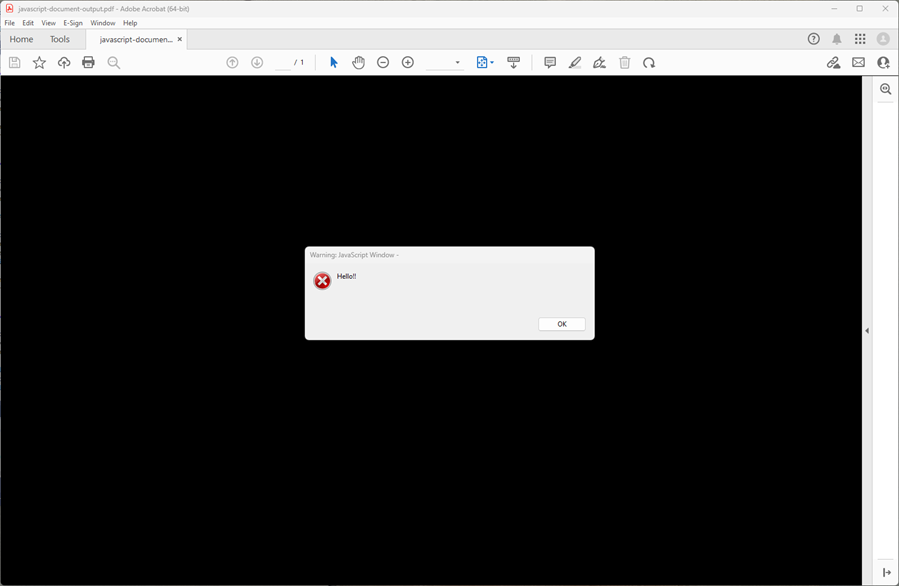
How to Add Document Level JavaScript
Below are the steps and C# sample code to add document level JavaScript to a PDF document when using DynamicPDF Core Suite for .NET.
Steps for Adding Document Level JavaScript Action
- Create a
Documentobject and add aPage. - Create a
DocumentJavaScriptinstance and pass the JavaScript to be performed in the constructor. - Add the
DocumentJavaScriptinstance to theDocumentinstance'sJavaScriptsproperty. - Add the
Drawmethod to output the PDF document.
Sample Code - C#
Document document = new Document();
Page page = new Page();
document.Pages.Add(page);
DocumentJavaScript docScript =  new DocumentJavaScript( "Say Hi", "app.alert(\"Hello!!\")" );
document.JavaScripts.Add();
document.Draw("output.pdf");
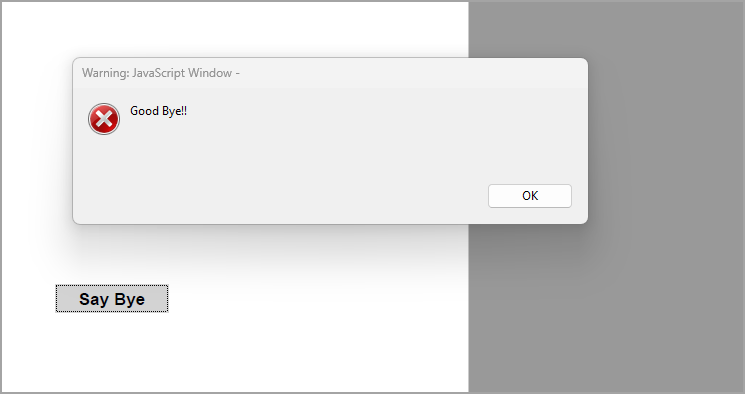
How to Call Document Level JavaScript from a Form
Below are the steps and C# sample code to call document level JavaScript from a form in PDF document using DynamicPDF Core Suite for .NET.
Steps for Calling Document Level JavaScript from a Form
- Create a
Documentobject. - Create a
Pageobject and add it to theDocument. - Create a
DocumentJavaScriptobject and assign the script to be executed. - Create a
JavaScriptActionobject and set the parameters. - Create a
Buttonobject to trigger the action. - Add the
Buttonto thePage. - Save the PDF document.
Sample Code - C#
Document document = new Document();
Page page = new Page();
document.Pages.Add( page );

document.JavaScripts.Add( new DocumentJavaScript( "Say Bye", "function bye(){app.alert(\"Good Bye!!\")}" ) );
JavaScriptAction action = new JavaScriptAction("bye()");
Button button = new Button( "Button", 200, 300, 100, 25 );
button.Behavior = Behavior.Push;
button.Label = "Say Bye";
button.Action = action;
page.Elements.Add( button );

document.Draw(@"Output.pdf");
GitHub Project
Examples are provided in C# and VB.NET. Clone or view the example project at GitHub. The example code is contained in the following files.
- C# - JavaScriptExample.cs
- VB.NET - JavaScriptExample.vb
Getting Started
Get started easily by installing DynamicPDF Core Suite for .NET through NuGet or manually. Then, refer to the documentation for more information on using and purchasing the product.
NuGet Package
The easiest way to install DynamicPDF Core Suite is by obtaining the NuGet package using Visual Studio's Package Manager. You can also obtain the NuGet package by downloading it directly. Refer to the installation documentation for more information.
DynamicPDF Core Suite Information
DynamicPDF Core Suite for .NET combines creating, merging, and visual report creation into one powerful product for creating PDF documents. It is ideal for anyone who needs to generate PDF documents or reports or work with existing PDFs in their applications. With a free Evaluation Edition to try and with flexible and royalty-free licensing options, why not start using DynamicPDF Core Suite for .NET today!
More Information on JavaScriptAction
- Refer to the JavaScript documentation topic, or
- Chapter 17, Using JavaScript, in the book DynamicPDF Core Suite for .NET by Example available on GitHub.
Available on Other Platforms
DynamicPDF Core Suite is also available for the Java and COM/ActiveX platforms. Refer to the respective product pages for more details.
- DynamicPDF Generator
- Java - DynamicPDF Generator for Java
- COM/ActiveX - DynamicPDF Generator for COM/ActiveX
- DynamicPDF Merger
- Java - DynamicPDF Merger for Java
- COM/ActiveX - DynamicPDF Merger for COM/ActiveX